Send to and Print from Microsoft 365 SharePoint/OneDrive
The Send to Microsoft 365 connector uses the Microsoft Graph API to allow users to access SharePoint or OneDrive. You can also create a connector to print from Microsoft 365.
Ensure you follow these configuration steps in the order they are presented. These instructions require you to perform configuration tasks in both the Microsoft Azure portal and in the Streamline NX Management console.
For instructions to help the MFP user to access the Send to Microsoft 365 functionality, refer to the Ricoh Streamline NX Connector User Guide.
Prerequisites
Before you complete these instructions, ensure you meet the following requirements:
-
An existing Microsoft 365 account through the Microsoft Azure Portal is required to register the client application
-
A default printer with proper print driver must be specified on the same server where the Delegation Server is installed.
-
Direct Print must be enabled within the SLNX Admin Tool (Configuration ® SLNX Embedded Settings ® Embedded Authentication).
1. Register a Client Application
To allow the connector to access the Microsoft 365 repository, you must register an application on the Microsoft Azure Portal.
-
Login to the Azure portal at https://portal.azure.com
-
Click Azure Active Directory ⟶ App registrations.
-
Click New Registration.
-
Enter a display name for the application (i.e. SLNX).
-
Select an account type:
- To use Login User mode, select Web and then copy/paste the value from the Redirect field on the Microsoft 365 Cloud Authentication Settings screen (refer to step 4 in 2. Configure Cloud Authentication Settings below).
- To use Proxy User mode, select Public client/native (mobile & desktop) and then enter the following URL: https://login.microsoftonline.com/common/oauth2/nativeclient
-
Click Register.
If both authentication modes are needed for connector usage, you need to register only one application on Entra ID Portal that can be used by both ‘Microsoft 365’ and ‘Microsoft 365 - Proxy’. In this case, there will be two Redirect URL entries, one with Type Web and one with Type Public Client/Native (Mobile & Desktop).
-
If Allow user consent for apps is unselected from Enterprise application -> Consent and permissions, the Azure Administrator must grant the following API permissions to the application:
-
Files.ReadWrite.All
-
Sites.ReadWrite.All
-
Offline_access
-
Leave this App Registration screen open while you move to the next set of instructions. You will need to copy and paste some information from Entra ID to SLNX.
2. Configure Cloud Authentication Settings
These steps require you to copy and paste information from the Entra ID app registration screen to Streamline NX.
-
Login to the Streamline NX Management console.
-
From the Navigation tree, click [Workflow] ⟶ [Cloud Authentication Settings].
-
From the Application list, click either Microsoft 365 (if you enabled Login User mode when you registered application on the Entra ID Portal), or Microsoft 365 – Proxy (if you enabled Proxy user).
-
Complete the following fields in the screen that appears:
-
Click Certificates & secrets ⟶ New client secret.
-
Provide a secret description and choose an expiration period.
-
Generate the secret. Copy the secret and then paste it in this field in SLNX.
|
Setting |
Options |
|---|---|
|
Application Type |
This field is filled in automatically – either Microsoft 365 or Microsoft 365 Proxy depending on your selection in step 3. |
|
Application Name |
Type a name for the application, such as ‘Ricoh OneDrive Connector’ or similar. |
|
Company Name |
Copy and paste this name from the Azure Portal overview page, generally in the format ‘xxxx.onmicrosoft.com |
|
Client ID |
Copy and paste this client/application ID from the Entra ID Portal application page for the new application you created earlier. |
|
Client Secret* |
If you enabled Microsoft 365 (Login User), you must generate a Client secret within the Entra ID portal: |
|
Tenant ID |
Copy and paste this directory/tenant ID from the Entra ID Portal application page for the new application you created earlier. |
|
Redirect URL |
If you chose Microsoft 365, this field is read-only and is populated based on your SLNX Core Server address. If you chose Microsoft 365-Proxy, you can edit this field if necessary. |
|
Product |
Enable SharePoint/OneDrive. If you will also configure Microsoft 365 Exchange connector, you can also enable the Exchange product. Refer to Send to Microsoft 365 Exchange. |
Client Secret is required for Login User only.
-
Click Test.
A new screen requires your username and password to authenticate with the Entra ID portal. If authentication is successful, the specified Client ID/Client Secret/Tenant ID/Redirect URL is passed to the Entra ID for authentication. When the options appear, click Accept to complete verification. If all verification completes successfully, a message indicates ‘Test successful’. If an error occurs, or if you click Cancel, a message ‘An unexpected error has occurred’ appears instead. Check your settings and try the Test again. Note that this Test is for confirmation purposes only and the authorization is not saved system-wide. Authorization from the User Console must still be performed.
-
Click Save to complete the settings.
3. Create the Connector
You can create four different connectors depending on your needs. The instructions below allow you to set up the following:
-
Send to SharePoint: Allows users to scan a document and send to a SharePoint destination.
-
Send to OneDrive: Allows users to scan a document and send to their OneDrive.
-
Print from SharePoint: Allows users to send a document to print directly from SharePoint.
-
Print from OneDrive: Allows users to print a document directly from OneDrive.
Repeat these instructions for each of the connectors you may want to create.
-
From the Navigation tree, click [Workflow] and then click select [Shared Connector Settings].
-
On the [Shared Connector Settings] tab, click
 [Add].
 -
When the Create Shared Connector screen appears, provide the following information:
|
Setting |
Options |
|---|---|
|
Connector Name |
If you are creating more than one Microsoft 365 connector, ensure you provide a prolific name that the user can easily determine the connector purpose based on its name. For example, if you are creating two connectors – One for Send to SharePoint and another for Print from SharePoint – ensure the individual workflows are clearly named and are reflective of the workflow contents to allow the user to identify the correct workflow on the MFP. |
|
Description |
|
|
Connector Category |
|
|
Connector Type |
|
|
Location |
|
-
Click [OK] to continue.
You will now see four active tabs: General, Setting, Preset, and Workflows.
-
Switch to the [Setting] tab.
Optionally, you can set a language-specific display name. Choose each language and then enter the corresponding text that will appear on the MFP.
-
Complete the following fields in this order in the Server Settings section. The fields are described in the table below.
-
SharePoint: Send to/Print from SharePoint Online with access to Team Site, library, or folder.
-
OneDrive: Send to OneDrive/Print from OneDrive.
-
Proxy User: The Login information entered below is used to authenticate. If you select this option, three new fields appear:
-
Email Address – This field will be automatically populated by the connector after successful authorization with the account from the pop-up screen.
-
Authorization URL -This field populates automatically when Microsoft 365 – Proxy is selected in the SLNX Cloud Authentication settings. This field is not visible or required for Login User.
-
Authorization Code - You must copy and paste the Authorization URL (above) into a web browser, and then login with a valid Microsoft 365 credentials to obtain the Authorization code. Paste the entire web browser URL field that returns in this field, and then click Authorize to complete the authorization. This field is not visible or required for Login User.
-
Login User: Scans documents to Microsoft 365 using the Microsoft 365 account(s) that the SLNX user authorizes from the User Console after logging in with an MFP user account. After selecting this workflow, a list of authorized Microsoft 365 accounts will be presented and the user must select one account to proceed and navigate the workflow.
-
User Name: Select one of Login User Name, User Email Address or a custom property (if defined).
-
Domain: Select one of Empty, Domain, User DN or a custom property (if defined).
-
IP Address – Enter the IP Address of the proxy server.
-
Port No – Enter the port number to connect to the proxy server. The default value is 8080.
-
Account – Enter the account to use to login to the proxy server.
-
Password – Enter the password to use to login to the proxy server.
-
Test – Click Test to ensure the connection is verified.
|
Setting |
Options |
|---|---|
|
Products |
Select the destination for this connector. Depending on the destination, the required fields differ. |
|
Authentication Method |
Select the authentication method to connect to SharePoint or One Drive. OneDrive impersonation must be configured in Microsoft 365 before you can enable OneDrive proxy access mode in SLNX. If OneDrive and Proxy access is selected above, the User ID shown in the Email address field must have access rights to the impersonated OneDrive repository. Refer to the Impersonated User section below. One-Touch Scan is supported by this connector only if OneDrive and SharePoint authentication method is Proxy User. If MFP logged-in user is not authorized, the workflow will open but the job will fail at execution time and job log status becomes “ERROR”. For instructions to enable One-Touch Scan, refer to Create a Workflow. |
|
Impersonated User |
If you selected OneDrive as the destination and Proxy User as the Authentication method, complete these fields to specify the attribute that will be used as the username for the Microsoft 365 name construction. You must also configure the Proxy user to match these selections in the SharePoint Admin Center. Refer to OneDrive Proxy User Configuration on SharePoint Admin Center. |
|
HTTP Proxy Server |
If you are connecting to SharePoint or OneDrive through a proxy server, complete the following fields. |
-
Complete the following fields in the Add/Delete a Startpoint Path section (optional). Click Add to begin and then complete these fields in the pop-up screen:
-
Enter a unique name for the startpoint path.
-
Specify the subsite that the MFP user will navigate from. If you leave this path blank, the user can navigate from the user’s SharePoint root.
-
For navigation from a subsite of the root site, enter a subsite name in the field.
-
For navigation from sites other than the root site, enter the path (i.e. sites/TeamSite1)
-
If left blank for SharePoint, it navigates from user SharePoint root.
-
For navigation from subsite of root site, enter subsite name only in the field.
-
Specify the library and/or folder path for the MFP user to navigate from. If you leave this field blank, the library and/or folder under the user’s default site is displayed on the initial screen.
-
If you select OneDrive, only the user default library can be navigated; therefore, you do not need to specify a library.
-
SharePoint – If left blank, the library and/or folder under user default site will be displayed on initial screen.
-
SharePoint – e.g. lib/f1/f2. If library does not exist, the node is disabled and cannot be navigated. If folder does not exist, the node is enabled. When it’s drilled down, error occurs. If the node is selected as destination, job fails.
-
OneDrive – e.g. f1/f2. Always use Documents library. If folder does not exist in the library, it will be created first before file gets delivered to it.
-
Enable this checkbox to display and allow site navigation at the MFP.
-
This button is only enabled if Proxy User mode is enabled.
-
Click Test to test the connection to the specified startpoint with the user credentials defined with Option settings.
|
Setting |
Options |
|---|---|
|
Display Name |
|
|
Subsite Path |
|
|
Folder Path |
|
|
Enable SharePoint Site Selection |
|
|
Test |
|
-
The following fields are also available only if Send to SharePoint is selected:
-
Enable this checkbox to allow MFP users to browse subfolders and select folders as destinations.
-
Enable the Subfolder Directory checkbox to create a subfolder under the destination folders. A folder will be automatically created under the destinations folder for all scanned documents. When this option is enabled, you must specify a Folder Prefix. Select a metadata item from the list. You can optionally enable the Add Suffix to Folder Name checkbox to add a suffix to the subfolder is one already exists with the same name.
-
When disabled, scanned documents are sent to and stored directly under the specified destination folder.
-
Specify the method used to name a scanned document in the destination folder. Use of these methods:
-
Manually enter the file name
-
Select a metadata item from the list to use as the file name
|
Setting |
Description |
|---|---|
|
Enable Subfolder Browsing |
|
|
Create a Subfolder |
|
|
File Naming Rules |
|
-
Set destination folder(s) in the [Preset] tab (optional).
-
Display the preset destination folder from SharePoint or Onedrive folder.
-
Administrator can only preset one destination folder per connector. However, MFP user can select more destination folders when using the workflow.
-
If selected product in Settings tab is SharePoint, you can navigate down from StartPoint path and select a sub-directory folder as preset destination.
-
If selected product in Settings tab is OneDrive and Impersonated User is configured, you can select one StartPoint path only as preset destination. The subfolders found in the configured StartPoint path can only be navigated on MFP using an authorized user. On the MFP, the preset StartPoint path is preselected, and user can navigate down to subfolders and select them as destinations.
-
You can remove all selected preset folders by clicking Reset All in Selected Destinations dialog.
-
Displays all the StartPoint paths created in Settings tab. Click the folder name to select the folder as preset destination.
-
Click
 to navigate to subfolders and click
  to go back to parent folder.
 -
These two settings are always disabled in connector configuration due to Graph API limitations, but these features can be used and working in MFP. Authorized MFP users can search and view folders or directories.
-
This will display the root or StartPoint folder or directory path. If you set SharePoint as product and navigate to multiple subfolders, you can click Root to go back to the starting path.
This tab allows Administrator to select StartPoint path folder as predetermined destination folder only if Authentication Method set in Setting Tab is Proxy User.
|
Setting |
Description |
|---|---|
|
Selected Destinations |
|
|
Folder/File Browser |
Disabled folder names cannot be selected as preset destination and caused by error(s) in configuration on StartPoint folder or subsite path. Please test your SharePoint or OneDrive connection and authentication on Settings tab. |
|
Search and View Folders |
|
|
Root |
|
-
Click Save to save the connector.
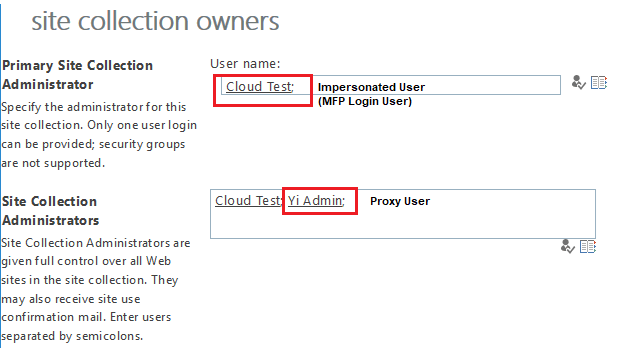
OneDrive Proxy User Configuration on SharePoint Admin Center
If you enabled OneDrive and selected Proxy User in the configuration above, you must also update the following settings in the SharePoint Admin Center.
-
Enter the Impersonated User name in the User name field. In this example, the user name is ‘Cloud Test’.
-
Enter the Proxy User email address in the Site Collection Administrator field. In this example, the user name is ‘Yi Admin’.
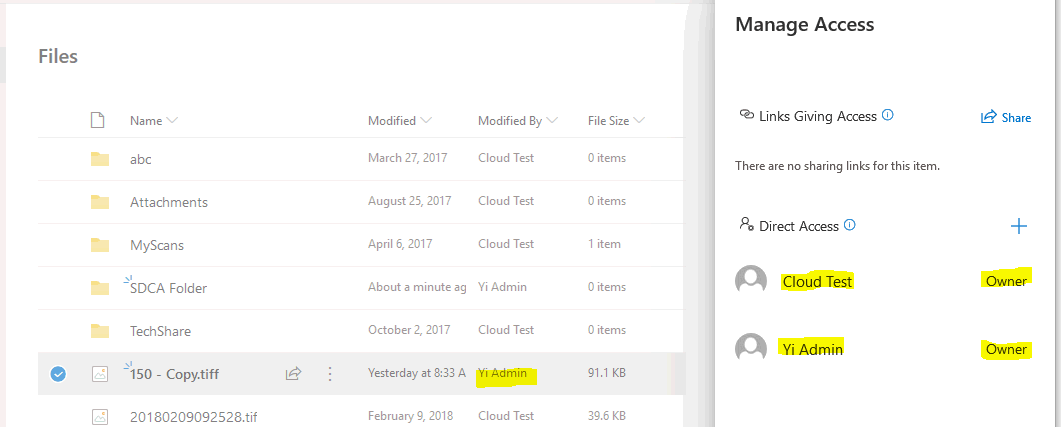
The screen capture below shows the result of the file delivery into One Drive. The delivered file is shown as ‘Modified By’ the proxy user. Both the proxy user and impersonated user are file owners.
Next Steps
The remainder of the configuration steps are common to all connectors. Refer to Common Configuration Tasks for instructions.